VBA Course: Properties
We will now act on the content and appearance of cells and sheets.
Start by opening the editor, add a module, copy the macro below and associate it with a form button (refer to the selections page if needed):
Sub properties()

    'Incomplete macro
    Range("A8")

End Sub
We want to perform an action on cell A8 with this start of the macro.
To display the list of possibilities that can be associated with the Range object, add a . after Range("A8"):
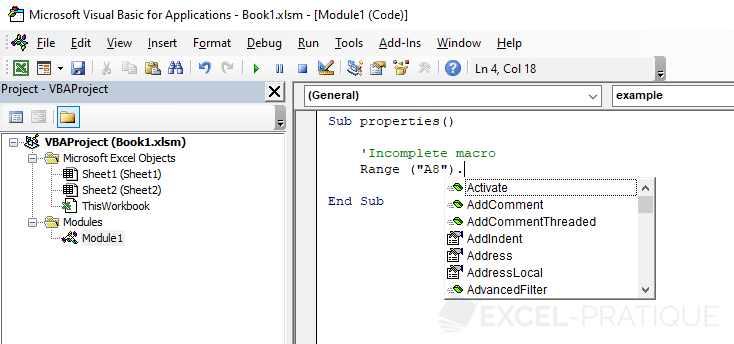
The editor then displays the different possibilities...
For this first example, click on Value and then press the Tab key to validate this choice:
Sub properties()

    'Incomplete macro
    Range("A8").Value

End Sub
The Value property here represents the content of the cell.
We now want to give the value 48 to cell A8:
Sub properties()

    'Cell A8 = 48
    Range("A8").Value = 48

    'Translation:
    'The value of cell A8 is now: 48

End Sub
Then, the value Text example to A8 (the text must be put between " "):
Sub properties()

    'Cell A8 = Text example
    Range("A8").Value = "Text example"

End Sub
In this case, it is indeed cell A8 of the sheet where the procedure is launched (here, the one where the form button is located) that will be modified.
If you create a second button on sheet 2, it will be cell A8 of sheet 2 that will be modified.
To modify cell A8 of sheet 2 by clicking on the button of sheet 1, you must specify the name of the sheet by adding Sheets("Sheet_name") before Range:
Sub properties()

    'Cell A8 of sheet 2 = Text example
    Sheets("Sheet2").Range("A8").Value = "Text example"

End Sub
Similarly, if you want to modify cell A8 of sheet 2 of another open workbook, you must specify the name of the workbook at the beginning of the line using Workbooks("File_name"):
Sub properties()

    'Cell A8 of sheet 2 of workbook 2 = Text example
    Workbooks("Book2.xlsx").Sheets("Sheet2").Range("A8").Value = "Text example"

End Sub
Although Value was used to illustrate these different examples, it is not necessary to indicate it, as it is automatically the value of the cell that is modified if nothing is specified.
These 2 lines generate an identical result:
Range("A8").Value = 48
Range("A8") = 48
Text Formatting
After selecting the Font property and adding a ., the list of properties that can be assigned to text formatting appears:
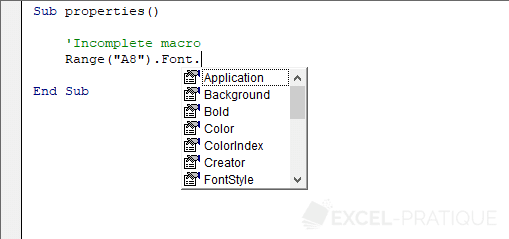
Color modification will be detailed on the next page...
Formatting: text size
Sub properties()

    'Change the text size of cells A1 to A8
    Range("A1:A8").Font.Size = 18

End Sub
Formatting: bold text
Sub properties()

    'Bold the cells A1 to A8
    Range("A1:A8").Font.Bold = True

End Sub
Bold = True means Bold characters = Yes.
To remove the Bold formatting from a text, replace Yes with No, in other words, True with False:
Sub properties()

    'Remove "Bold" formatting from cells A1 to A8
    Range("A1:A8").Font.Bold = False

End Sub
Formatting: italic text
Sub properties()

    'Italicize cells A1 to A8
    Range("A1:A8").Font.Italic = True

End Sub
Formatting: underlined text
Sub properties()

    'Underline cells A1 to A8
    Range("A1:A8").Font.Underline = True

End Sub
Formatting: font
Sub properties()

    'Change the font of cells A1 to A8
    Range("A1:A8").Font.Name = "Arial"

End Sub
Add borders

Sub properties()

    'Add a border to cells A1 to A8
    Range("A1:A8").Borders.Value = 1

    'Value = 0: no border

End Sub
Modify the formatting of the current selection
Sub properties()

    'Add a border to selected cells
    Selection.Borders.Value = 1

End Sub
Modify the properties of a sheet
Sub properties()

    'Hide a sheet
    Sheets("Sheet3").Visible = 2

    'Visible = -1: display the sheet

End SubModify the value of a cell based on another

The goal here is for A7 to take the value of A1, which gives us:
Sub properties()

    'A7 = A1
    Range("A7") = Range("A1")

    'Or:
    'Range("A7").Value = Range("A1").Value

End Sub
Or to copy the text size, for example:
Sub properties()

    Range("A7").Font.Size = Range("A1").Font.Size

End SubModify the value of a cell based on its own value
We will now create a click counter here.
With each click, the value of A1 will be increased by 1:
Sub properties()

    'Click counter in A1
    Range("A1") = Range("A1") + 1

End Sub
This line should not be interpreted as a mathematical operation (remember that what is on the left of the = takes the value of what is on the right of the =).
Excel executes the code line by line respecting certain priorities, these comments should help you understand this code better:
'For this example: A1 is worth 10 before the code execution

Sub properties()

    'A click has been made on the button, we enter the procedure
    'For the moment A1 is still worth 10

    'During the execution of the line below:
    '- the value to the right of the = is calculated first (A1 is still worth 10, this gives 10 + 1)
    '- after calculation, the value to the right of the = is therefore 11
    '- A1 then takes the value to the right of the = (or the value 11)
    Range("A1") = Range("A1") + 1

    'A1 is then worth 11 only after the execution of the line of code

End Sub
With
This code allows you to define different properties for cell A8 of sheet 2:
Sub properties()

    Sheets("Sheet2").Range("A8").Borders.Weight = 3
    Sheets("Sheet2").Range("A8").Font.Bold = True
    Sheets("Sheet2").Range("A8").Font.Size = 18
    Sheets("Sheet2").Range("A8").Font.Italic = True
    Sheets("Sheet2").Range("A8").Font.Name = "Arial"

End Sub
We can use With to avoid repeating Sheets("Sheet2").Range("A8"):
Sub properties()

    'Start of the instruction with: With
    With Sheets("Sheet2").Range("A8")
        .Borders.Weight = 3
        .Font.Bold = True
        .Font.Size = 18
        .Font.Italic = True
        .Font.Name = "Arial"
    'End of the instruction with: End With
    End With

End Sub
Sheets("Sheet2").Range("A8") is therefore no longer repeated.
Although it is not essential in this case, it is also possible to do the same for .Font, which would give us:
Sub properties()

    With Sheets("Sheet2").Range("A8")
        .Borders.Weight = 3
        With .Font
            .Bold = True
            .Size = 18
            .Italic = True
            .Name = "Arial"
        End With
    End With

End Sub